Empire in Flames New Player Guide and FAQ

New Player Guide and Frequently Asked Questions

Welcome to Empire in Flames! Below you’ll find answers to the most common questions our new players have. It also contains helpful information and references to other player guides you may find useful in your adventures.


How do I start playing?

Getting Set-Up

Step 0) Before you install Empire in Flames, you need to install SWGEmu and ensure that it works. You can find their instructions here.

Step 1) After you have installed SWGEmu (and verified that the game runs), download the Empire in Flames launcher here.

Step 2) Install the Empire in Flames launcher. Depending on which version of Windows you are running and your settings you may have some additional approvals based on UAC.

Step 3) After the installation of the launcher has completed, run the launcher.

Step 3a) You’ll have to point the EiF launcher at your SWGEmu install, so click on “SWG Install” and navigate to where you’ve installed SWGEmu – this is not the location of their launcher, but a directory that contains swgemu.exe

Step 4) After you have completed the above, the game will begin to patch. This may take a while depending on your connection speed.

Step 5) While you wait, head to our forums and create your account. Your forum account is linked to your game account, so make sure you remember the information as this is what you will use to log into the game. Do not share this information with anyone else.

Step 6) Once the launcher gets to 100%, read our Terms of Service, check the “Agree” box, and launch the game with the same username and password you created on the Forum.

Step 7) Create your first character and have fun.

Troubleshooting:

  • If you are having issues with the launcher, try running it as an administrator.
  • Occasionally you will need to whitelist the launcher in your antivirus software before it can run. This is less common, but still something to be aware of.
  • You will need to run the launcher as administrator every time if you set your EiF install directory as C:\Program Files\ or C:\Program Files (x86)\ – we have found the best result is to install it on a second drive or in its own folder outside Program Files.

Help! I logged into my account and none of my characters are here! What do I do?

Try not to panic. In almost every case, this is caused by accidentally mistyping your username. Log out, check your syntax and caps-lock key, and make sure you are logging into the correct account that you previously played on. If you cannot remember your username, search your game install directory for a file called “characterlist_youraccountname” – the listing here will show your account information. If you have forgotten your password, please reach out to an administrator via Discord. 

How many characters can I make, and what options do I have?

Characters

  • Characters: You can make 3 characters on your account, and have all 3 online at the same time.
  • Races: EiF features many new species/races that you may not have seen before. Be sure to check out all the options before you decide. We’ve also recently added Feeorin, too!
  • Character customizations: We have limitations on what customizations EiF is able to implement, but if it’s possible in the future, we’ll add more customizations
  • Racial Bonuses: Each race has different bonuses that may help you with combat or crafting. You can find them all listed at character select, or by reading up on the posting http://www.empireinflames.com/?p=282
  • Languages: Players start with one or more and can teach them to each other. EiF has added more languages and may add more going forward.

Can I have multiple accounts?

No. Multiple Empire in Flames Accounts are not permitted. Each user may only have one account per household unless approved by our staff. Measures are incorporated to detect multiple user accounts. If you would like to submit a request for another member of the household for the staff to review, you can do so at https://empireinflames.com/forum/viewforum.php?f=50

I’ve made my character. What do I do now?

Starting Out

  • Utilize EiF’s Social Media to connect with staff and players outside of the game. You can find the connection information here.
  • In game, the galaxychat channel is an excellent place to chat, connect, and ask questions
  • Start in a Player City. The NPC cities are not nearly as active as our player cities. Ask in Discord for recommendations. If you lean Imperial or NR, we have those! If you want to craft, some cities are excellent locations. If you are more of a roleplayer, there are cities with a lot of RP possibilities. Here is a listing of the current player cities in EiF.

Continue reading

Friday Feature! Powerups: Cornerstone of an Empire

In today’s Friday Feature, Demiurge once again provides insight into another important aspect of crafting – powerups! So without further ado…

—-

Powerups: Cornerstone of an Empire

Last week, I wrote about Armorsmithing on EiF.  This week I wanted to write another article to address questions, opinions, and concerns about crafting in general in SWG.  Crafting comes in many forms in this game.  More and more often, I hear people commenting on how it’s impossible to gain a foothold into it or compete with established players.  This article is intended to specifically address that misconception.

Most people who have played on EiF for any length of time know who I am.  I am primarily associated with the crafting of armor, even though I also make weapons, artisan wares, some architect items, and every now and then clothing, BE, and medical items too.  But here’s one of my biggest secrets: I make a large chunk of my credits crafting an item that a new player can make within a day or two of character creation… Powerups.

So just like with last week’s write-up, I will break down what it takes to craft them.  As you might suspect, Powerups are one of the easiest items to craft in the game.  There are no subcomponents and each craft takes a combined 10 resources: 6 minerals and 4 chemicals.

Here are the essential factors that will determine your success or failure:

  1. Your resources – This is the single most important factor in determining a Powerup’s statistics.
  2. The crafter – Are you a Master Artisan?  That’s all you need.  No need for any extra tapes.  No need to be anything other than a 10 point crafter.
  3. Your crafting tool – The stats of your crafting tool matter (again, the crafting station does not). You will want a Weapon, Droid, and General Item crafting tool.
  4. Where are you performing the craft – Crafting in a player city is always the most desirable way to make something.  As with other types of crafting, Research Centers are the best location to craft a powerup (as each individual craft will use a ton of single-point experimentation rolls).
  5. PATIENCE – I mention this one last, but it is really just as important as the resources you use.  This is because it takes a tremendous amount of patience to craft, scrap a craft that isn’t exactly what you want, and try again.  I have been known to scrap over a thousand attempts for a single one I like enough to turn into a factory schematic.

Food and Drink are irrelevant for crafting powerups, as are Skill Enhancing Attachments.  They are not needed, and even without them, you will still be able to craft server-capped powerups. Please note: while it is not important to have more than 10 experimentation points for powerup crafting, having +25s to both assembly and especially experimentation will still be beneficial in the sense of improving each experimentation roll to help with its quality… but it is not mandatory. Before I get into the discussion on how to make a powerup, I would like to share an old website that has a lot of valuable information pertaining to the crafting of powerups.  I will fill in the blanks as they apply to EiF, since the website’s data is not 100% accurate for us.  Nevertheless, Agock wrote an excellent guide for its time, and I still reference it on occasion to remind myself what stat combinations are possible.

https://www.swgemu.com/archive/scrapbookv51/data/20070205033706/index.html

What Exactly is a Powerup?

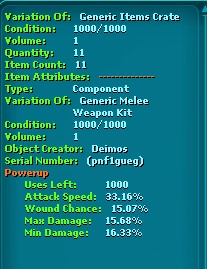
A powerup is a simple crafted item that is added to any normal weapon you might want to use (heavy Commando weapons such as a flame thrower or acid rifle and a Bounty Hunter’s Light Lightning Cannon are examples of weapons that can not be augmented with a powerup).  A powerup consists of a primary stat modification, and any number of smaller, secondary stat modifications (anywhere from zero to five, depending on the type of powerup crafted).  The primary stat modification is the major upgrade.  For purposes of example, please see the picture below:

This is a basic, 4-stat melee powerup.  The primary modification is the first stat listed (Attack Speed).  The other stats listed below are secondary modifications.  EiF has modified the “uses left” stat for our server.  On any other server I’ve seen (including live), powerups each have 100 uses.  Here, they last 10 times as long (1000 uses).  This is a major quality of life improvement for players because, for some end-game content (or PvP), it would be extremely easy to blow through those 100 uses and have to worry about placing another PuP (short for Powerup) on your weapon, mid-battle.  As someone who has crafted them for years, I will also tell you that they still sell daily.. so it is not a market killer (as you simply sell them for more than elsewhere).

Continue reading

EiF Armor Crafting 101

In today’s feature, we bring you a very in-depth write-up on armorsmithing by the illustrious armor crafter Demiurge. In this article, Demi outlines what it takes to be a successful armorsmith on Empire in Flames as well as give insight into the changed systems you’ll find, some best practices, and tools of the trade to help any aspiring crafters become the best they can be and in his words, “knock him off of his pedestal”. Thank you, Demiurge!

——

EiF Armor Crafting 101

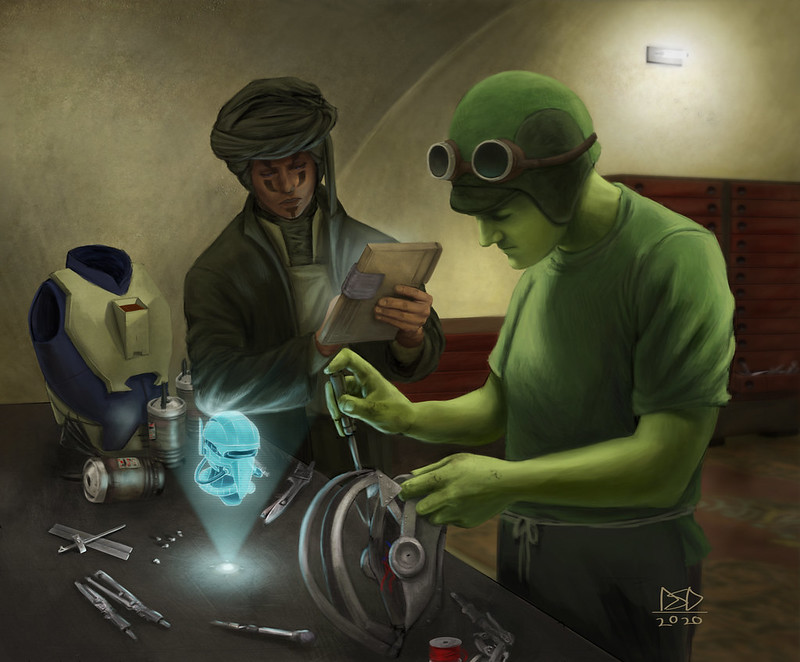
Artwork courtesy of AgentOrangeJuice

Introduction

The purpose of this guide is to explain how armor crafting works on EiF and demonstrate how it is different from any other server you might have played on.  I intend to explain every important aspect and consideration in order to teach you how to craft armor with the exact same stats that I am able to currently make.  I have been making armor continuously on our server for the last three years.  In that time, due to the among of sheer work I’ve put into it, I believe I have become the dominant armor crafter here.  I hope to teach and inspire you to be able to match what I am capable of, and ultimately to surpass me.

For those of you who have experience crafting armor on any other SWG server, a good bit of this will be familiar or previously understood the content.  But what makes armor different on EiF is the usage of armor cores.  The purpose of an armor core is to allow all types of armor to be of similar or equal stats.  A core consists of up to three armor segments, with each segment containing zero to nine armor layers.  Armor on EiF requires one to five armor cores, depending on the armor type.  This means that, unlike other servers where specific segment types are required for its corresponding armor type (composite or advanced composite segments to go into any piece of composite), the same armor core can be used in ANY armor type.  This modification to the system allows basically all armor types to be craftable within a very tight range of stats between one another (I will explain further below) and opens the door to a wide array of looks, styles, and viable options.  You won’t just see people running around in RIS or Composite.

Before I break down layers, segments, and cores further, it is important for you to understand how a piece of armor gets its stats.  On EIF, 95% of the stats provided to a final, crafted piece of armor comes from the armor core itself.  The remaining 5% are derived from the final assembly resources that are specific to a type of armor.  For example, crafting a piece of RIS would require (among other things), a specific resource like Platinite Copper, while a piece of Bone armor would require a generic resource such as “metal”.  This fact alone allows Bone armor to have a much wider array of possible resources to satisfy that requirement.  This is critical because all resources have min and max possible stats in several key areas that are very important to armor.  Plantinite has a less advantageous range of stats than many other types of metal, such as steel, iron, or even other types of copper.  This deviation in final assembly resource requirements is what allows a range of 1-5% variance between what you might see on the final crafted product (speaking specifically on the final types of damage resistances).  The maximum craftable resist per damage type is a theoretical 55%.  If perfectly sliced by a Smuggler, this value can reach 60%.

Halyn, and sometimes in conjunction with various staff members, has made numerous design decisions that set EiF apart from how things are done elsewhere.  In an attempt to completely eliminate spawn camping, the team has removed the ability to use looted components from various mobs as augments to crafted armor pieces.  Items like Janta Hides, Rancor Hides, etc, are not used in armor crafting here.  Therefore, the essential factors that determine your final product are:

  1. Your resources – This is the single most important factor in determining armor’s final quality.
  2. The crafter – Are you a 12 point smith, fully taped for assembly and experimentation?
  3. Your crafting tool – The stats of your crafting tool matter (while the stats on the crafting station itself does not).  The maximum stat of a crafting tool is a 15.0
  4. Food/Drink – Foods such as Pyollian Cake will offer a decent assembly bonus to your crafting roll, helping your chances of crafting an amazing assembly.  Drinks such as Bespin Port will do the exact same thing for each of your experimentation rolls.  Experimentation is the more desired buff of the two (though both can be utilized at the same time).
  5. Where you perform the craft – Crafting in a player city is always the most desirable way to make something.  A level 5 player city gains the ability to set a “city bonus”.  Two of these (Manufacturing Center = Assembly bonus, and Research Center = Experimentation bonus) grants bonuses to every craft that occurs within its city limits.

These are the five factors to keep in mind when you craft something.  Other factors, such as a crafter’s current battle fatigue or wounds do not factor into the crafting equation!  With this in mind, let’s look at the single most important factor in your crafting process: the resources used.

Continue reading

A Guide to the Sith Shrine

The Sith Shrine is the newest, hottest content on Empire in Flames. Set in a Sith temple buried deep on Coruscant, adventurers are asked to investigate…in spite of the disappearance of previous teams. Up to five players can venture into the Shrine to confront danger and potentially emerge with previously-unacquirable loot!

The Sith Shrine starts by speaking with a very grumpy Dug in a diner in the Collective Commerce sector on Coruscant.

Ultimately, there are six boss encounters along the way, though two of them are relatively easy. Players should be prepared in advance with equipment, food, and drink. Some suggestions are included.

The server team has run the Shrine with multiple groups and found, in general, the best groups include a main tank, an off tank, and at least one doctor. Remaining roles have been filled with a variety of classes and skill setups with varying degrees of success.

Every player should be equipped with a suit of armor, PSG, and at minimum a very good weapon. Doctor and entertainer buffs are highly recommended; in event of a wipe mid-instance, at minimum the tank characters should be re-buffed with doctor buffs. Suggested food and drinks are included in boss fights tips.

Players should be familiar with their specials – even basic DPS players should be using several. Boss characters should always be stated with as many states as possible. Intimidation is the most important, as it reduces damage output from NPCs. Bleeds and burns are also important on high-health bosses, as those cause boss characters to rack up battle fatigue, which reduces the effectiveness of their armor.


Boss 1: The Hulking Dark Trooper

Known exclusive loot: Dark Trooper painting, Elite Dark Trooper painting, Droid Armor Mesh schematic, Dark Trooper Exoskeleton armor schematic

The Dark Trooper is your first boss, a massive war machine left in place by the Shrine’s master. He is completely stationary, but has a nasty rotating cannon he uses at range and is a powerful melee fighter in close.

During the fight, he occasionally spawns four astromech droids around the room. If those droids are not destroyed, they will repair any damage the Dark Trooper takes during the fight. If the astromechs are not suppressed, the fight will take a long, long time.

Primary tactics: Tanks fight the Dark Trooper directly. Doctor focuses primarily on heals, with secondary focus on shooting astromechs. Remaining players focus on droids the moment they spawn and offer DPS on the Dark Trooper when droids are all down.

Suggested food and drink: Accaragm (action regeneration), Vasarian brandy (mind regeneration)


Boss 2: Terentatek

Known exclusive loot: none

The Terentatek is a creature of the dark side, twisted into being by devotees of the Sith. They are ugly, hungry beasts who seek out and destroy Jedi. However, a well-armed group of adventurers should be adequate to the task.

Primary tactics: tank and spank. Keep ranged fighters well back to prevent them from being caught by the terentatek’s massive AOE knockdown.


Boss 3: The Dark Side Sorcerer

Known exclusive loot: Various zombie paintings.

A devotee of the dark side, the Sorcerer has delved deeply into unnatural abilities. He will call upon the shadow of the Force to attack adventurers with lightning and telekinetic abilities, but most disturbingly, he will raise an army of undead to fight on his behalf.

Worse, if these undead are struck down, he draws strength from the destruction, regenerating health with each of his minions struck down!

Primary tactics: One tank focuses on the sorcerer. Secondary tank taunts all zombie spawns to keep the focus away from the group. All characters use single-target specials to fight the sorcerer and prevent unexpected deaths of zombies that prolong the fight.

Secondary tactic: Ideally, the “zombie magnet” is not a primary or secondary tank. Most ideally, the character is a fencer, as they dodge attacks entirely. Swordsman tend to do poorly in this role, as counterattack secondary defense means the zombies will die during the fight and prolong it. The character in this roll will take a lot of small attacks and likely stack up large amounts of battle fatigue and take reduced heals, which is detrimental during the Sun Guard fight.

Suggested food and drink: Pikatta pie (defense), synthsteak (damage reduction), exo-protein wafers (damage reduction)


Boss 4: Terentatek (redux)

Known exclusive loot: none

Players have already fought a Terentatek once; exercise those tactics again, and this Sithspawn will not be a problem.

Primary tactics: tank and spank. Keep ranged fighters well back to prevent them from being caught by the terentatek’s massive AOE knockdown.


Boss 5: The Sun Guards

Known exclusive loot: Sun Guard armor schematics

Sith cultists or loyal mercenaries, depending on the source, the Sun Guard is one of the most feared mercenary groups in the galaxy…and for good cause.

In battle, the Sun Guard will fight exclusively melee with force pikes with a full range of deadly polearm attacks. They also fight as a unit, and will heal each other periodically in combat. Success against previous bosses is no guarantee of victory here; many have died at their hands.

Primary tactics: Main and secondary tanks each take a Sun Guard and draw them to the back wall. Doctor focuses exclusively on healing from the front wall, which should be just out of reach of the Sun Guards’ AOE attacks. Non-melee characters also cluster against the front wall to keep doctor healing requirements at a minimum.

Secondary tactics: The Sun Guards will periodically compare HAM, wounds, and battle fatigue; when they do, each Sun Guard reverts to the higher level of each. As such, they must be brought down together rather than focusing one and then the other. While stating is important in all boss fights, during the Sun Guard fight it is critical as a non-intimidated Sun Guard can quickly put down a tank.

Ideally, a fencer should not tank a Sun Guard. While it is possible, fencer’s low toughness means he will rack up damage faster than other melee classes and put more pressure on the doctor to keep up.

It’s important for players focusing on burns and bleeds to switch targets constantly to lay a consistent level of bleeding and burning on each boss, or much of their effort will go to waste.

Players must keep a very close eye on food and drink during this fight; failure to do so may result in party wipe. It’s also worthwhile for tanks with meditate to power boost before this fight.

Suggested food and drink: Pikatta pie (defense), exo-protein wafers (damage reduction)

(Due to the long nature of this fight, tanks will get more use out of the low-filling wafers than they would out of high-filling synthsteak.)


Boss 6: The Sith Initiate

Known exclusive loots: Nightsister bicep schematic, Sith mask schematic, Mandalorian mask schematic, Lightsaber pike schematic, Holocron, Sith Holocron

There are always two Sith Lords – a master and an apprentice. However, there are initiates, candidates, and others who have pursued the dark arts but not risen to the rank of Apprentice.

These initiates can be deadly and dangerous in their own right…

The Sith Initiate will not fight players alone, but with three telekinetically controlled floating lightsabers!

Primary tactics: Area attacks are king. Draw the floating lightsabers in and use area attacks to bring them down along with the Initiate.

Secondary tactics: Keep an eye on the initial spawn of lightsabers. They have a tendency to all pick a single player and focus on him. If that player is the primary healer or a ranged character and isn’t ready, they could rapidly be killed. Once past the initial spawn stage, the fight tends to be much easier than the Sun Guard battle. Burns and bleeds can bring the initiate down much faster than strictly DPS.

Suggested food and drink: Pour on everything for this fight – it’s your last, so don’t let your stomach space go to waste!

Welcome to Empire In Flames

An Empire in Flames is a post-Endor server offering a new, unique Star Wars Galaxies experience!

What’s the 10,000 foot view?

Empire in Flames began conceptually before the shutdown of the live servers with a design friendly to Roleplayers, PvE players, PvPers, and pilots. It started as, “What’s your ideal server?” It started with a new profession system, expanded to housing and races, and dreamed of a Galactic Civil War in practice instead of imagination. In short, it’s the concept of a Star Wars game as dreamed by a small group of long-time Starsider players – players who were RPers, PvErs, PvPers, crafters, and pilots, none of whom fell into the trap that any of the major combat systems – pre-CU, CU, or NGE – was by any means perfect.

A new profession system

Empire in Flames offers a new approach to the system – one that combines the best of the ideas of the NGE and pre-CU.

Trees are categorized as “professions” and “skills.”

Professions cost no skill points (though they require XP to level). However, a player can only have ONE profession at a time. Professions include:

Bounty Hunter
Commando
Doctor
Entertainer
Merchant
Ranger
Smuggler
Squad Leader

Abilities acquired from professions can be used with any weapon, or even unarmed. Professions offer enhancement, access to specialized skills like slicing, vendors, creature harvesting, and so forth.

Skills, on the other hand, require skillpoints and can be freely mix-and-matched. They, too, require XP to level; however, all skills can be learned from their novice box up. Prerequisites are not required.

Architect
Armorsmith
Artisan
Bio-Engineer
Carbineer
Chef
Creature Handler
Dancer
Droid Engineer
Fencer
Image Designer
Medic
Musician
Pikeman
Pistoleer
Rifleman
Shipwright
Swordsman
Tailor
Teras Kasi Artist
Weaponsmith

Skillpoints have been adjusted to allow a player to pickup approximately 2 1/2 trees, with some exceptions. (Image Designer, Dancer, and Musician together reach 250 points, for example.)

A new approach to housing

Like most branch servers, Empire in Flames offers additional housing options not available on Basilisk – and a few not available on any other branch server. However, player cities take a central role; player houses are required to be built inside city limits.

No more crust of housing on the edge of the no-build zone around NPC starports. No more endless sea of houses on Tatooine. Instead, players have more reason than ever to cooperate – “home” is now a community.

New Races

While “new races” are proliferating across the branch servers, they started with Empire in Flames. After unauthorized use of our code on other servers, we decided to release them for other servers to use…and used they have been. Still, we’re not resting on our laurels – we’re working to add even more options, even when it means we’re pestering Timbab for a new tool to make it happen.

A New Setting

The decision to move post-Endor is partly driven by roleplay, but also by a desire to implement a proper Galactic Civil War. While the immediate ramifications of the time shift are largely cosmetic, it does mean new themeparks will be coming – after all, Jabba the Hutt, Darth Vader, the Emperor, and Xizor are all dead.

How will you position yourself to rise to power?

We respect existing lore that has happened before Endor, but past that we will be creating our own lore, pulling bits and pieces from varying sources. We simply don’t think the way things go in the new canon with Jakku and all makes for very compelling gameplay or storytelling, but we also can’t trod down the path of Legends as its over saturated and restricting.

Crafting Revamp

One of the most controversial changes we have adopted is a crafting revamp for weaponsmith and armorsmith.

Instead of the old crafting system, we moved to a “core”-based system. The base of every weapon is a core, whether it’s a pistol, carbine, rifle, or melee weapon. The core determines critical stats like HAM cost, damage, and speed. Additions like stocks, scopes, and customized barrels are done at the weapon-level to modify those core stats. In essence, any weapon or armor can be made good. Empire in Flames is more than powerhammers and T-21s and composite armor.

A Roadmap Forward

Post-launch, the next three major patches are planned: Galactic Civil War, Schisms of the Force, and Underworld. The first is to bring a proper Galactic Civil War to the galaxy; the second to implement the Jedi profession; the third to reveal black markets, smuggled goods, player bounty hunting, and Crime Lords.

Along the way, other content is planned – new themeparks for the New Republic and the Empire, a three-faction questline over the fate of Jabba’s criminal empire, and a series of post-Endor based heroic encounters.

Also check out our Q&A from the summer!
And the whole Friday Feature Archives